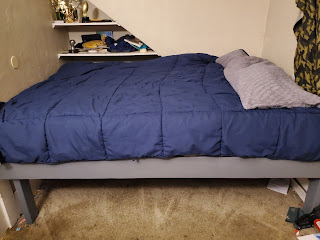
Building My Son's Bed from Scratch
I have been wanting to build my son a new bed for over a year now. I wanted something sturdy that he could not break and I wanted him to help me build it so he'd appreciate it; plus it was a great mom and son project. My initial thought was to build it out of pallets. I just never got around to picking any up. As time went on I realized that in order to build the size bed he would need, I would need 12 pallets and I'd have to cut 6 of them more than half and somehow stabilize them in order to make it the size of a full-sized bed. The space where his bed goes doesn't allow anything bigger than a full-sized bed and he definitely wasn't going to have a twin-sized bed.
I ran through the plans in my head over and over again. I sketched diagrams of different looks and researched online for styles and ideas until I knew exactly what I wanted. This isn't a how-to but I am going to share how I put this all together. I'm also including a video of our progress throughout the building process. So, if it helps you then great but, this is what worked for me and he has a great bed he can be proud of.
Materials I used:
2-2×6×16
2-2×6×10
9-1×3×8
3-2×4×8
3-3/8 bolts, 6 washers, and 3 nuts
Nails and screws
1 gallon of grey paint
2-2 drawer shelves
Tools I used:
2 in 1 Nailer
Palm Nailer
Drill
3/8 Ratchet
3/8 Drill Bit
2-C Clamps
Air Compressor
Sander
Spray painter
All of the wood was cut at the store for free, all I had to do was assemble it. 4-72in, 4-27in, 26-27in, 10-21in, respectively. I started with the 2 frame pieces. I decided to make 2 frames instead of one large frame to make it easier to transport. Each frame consisted of the two 72 inch and two 27 inch pieces of 2x6. Using the palm nailer, I nailed the pieces together creating two rectangular frames. The smaller pieces were on the outside. Each frame measured 27x75 when finished, together creating a 54×75 full-sized bed frame. I then used the C clamps and clamped the two frames together. Using the 3/8 drill bit, we made 3 holes, one in the middle of each frame and one at each end.
I then laid 13 of the 1x3 pieces 1-1/2 inches apart on top of each frame. Using the nailer we put two brad nails at each end.
For the legs, I predrilled all of the holes in each leg. Then I flipped each piece over and screwed one 2x4 into each end of the frame and one in the middle on the side of the hole for additional support. For each frame I put the middle leg on opposite sides of the middle hole for balance.
Once the frame was constructed, it was time to apply wood putty as needed and sand it all smooth using 120 grit sandpaper.
After wiping away all excess sawdust. I painted the frame grey.
My plan is to paint the storage drawers to match, I have already assembled them. I am also painting his existing dresser to match the bed and replaced the hardware on all to give it a cohesive look. I also need to replace his curtains.
Overall, his bed looks pretty good so far.
And...It Is What It Is!


Comments
Post a Comment